Putting trim on the pocket (optional)
- Fold the trim fabric, right side out, along its length so it looks like two double fold hems touching each other (hopefully it's clear on the picture)
- Pin the folds in place and press


- Open the trim and pin to the top of the pocket, right sides facing
- Stitch along crease that is second from the top of the pocket (as shown in picture below)


- Press the seam open
- Fold in the raw edge of the pocket and press
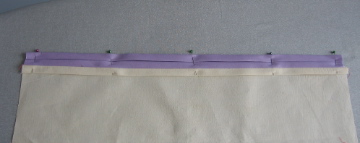
- Fold the rest of the trim along the original creases and press
- Pin to secure the folds


- Stitch three rows of stitching to secure all the folds


Notes:
- If you don't want to add trim to the pocket, you can just make a double fold hem instead.
- I'm making the trim in this way because it's less bulky than adding bias binding. After attaching the pocket to the body, I want to use a flat felled seam to turn the whole thing into a tube. Less bulk will make it easier to make the flat felled seam.
- Pin the wrong side of the pocket to the right side of the body (so that you see the right sides of both -- this will be the outside of the bag)
- Machine baste using 1/4" seam allowance (i.e. attach the pocket to the body -- the thread here won't show once the bag is done, so I'm just using up some of my bobbin thread for this step)


Making the 3 Individual Pockets
- Mark two lines from the bottom to the top of the pocket, 6.5" from each side (you can use chalk or markers -- here, I'm using pins)
- Sew along these lines from the bottom of the pocket to the top
- Reverse when you get to the top of the pocket, to secure the stitching


That's it for today's post. Tomorrow, we'll make this into a tube using a flat felled seam.
No comments:
Post a Comment